TUTORIAL · STEP BY STEP
Shadowrocket Tutorial: Adding a Subscription to Verifying the Connection, Step by Step
This page breaks the job of getting your existing subscription or server into Shadowrocket, and confirming that traffic really goes where you expect, into five steps: add a server or import a subscription, choose a Global Routing mode, turn on the switch to connect, verify that it works, and troubleshoot failures one by one. Each step says where to tap, which interface term you should see, and what to do next. To learn the settings stage by stage, see the Complete Guide.
- iOS / iPadOS
- Genuine App Store version
- One-time purchase
- Interface terms stay in English
Jump to a step
This page assumes two things are already in place: first, Shadowrocket has been installed from the App Store — see the App Store verification page for installation and for confirming your copy is genuine; second, you already have your own subscription URL or server details. Subscriptions and servers always come from your own provider; this site does not provide, sell, or recommend any subscription or server.
One more thing to keep straight: buying the client once is not the same as buying a service plan. What you pay for on the App Store is the Shadowrocket client itself, and it comes with no server, no traffic, and no connection of its own. Whether you can connect, and how fast it is, depends on your own subscription or server.
The five steps below are in dependency order: without a successful add there is no routing to speak of, without the right routing mode there is nothing to verify, and only when verification fails do you need the troubleshooting section at the end. Each step heading lists the interface path, so you can just follow along; interface terms are kept exactly as they appear in the app, with a plain-language note in parentheses.
-
Add a server or import a subscription
Interface path: Home → + in the top-right corner → Add Server / Subscribe
Open Shadowrocket and the first thing you see is the Home page. Home has two halves: the top holds the connection switch, Global Routing, and Connectivity Test; the bottom holds the SERVER group, which lists the servers and subscriptions you have already added. On first use the list is empty, and the entry point for adding is the + button in the top-right corner.
Tapping + gives you two common paths. The first is a single server: choose Add Server and fill in Type (protocol), Host (server address), Port, Password, and Method (encryption). Every one of these values comes from your provider — copy them exactly and do not guess. Type offers Shadowsocks, VMess, VLESS, Trojan, Hysteria2, WireGuard, and more; picking the wrong protocol is one of the most common causes of failure. At the bottom of the Add Server page there are two shortcuts: Scan QR Code uses the camera to scan a QR code from your provider, and Import from Cloud JSON imports from a cloud JSON file — when your provider offers either of these, they are far less error-prone than copying by hand.
The second is a subscription: choose Subscribe and paste in the whole subscription URL your provider gave you (in the form
https://example.com/sub?token=xxxx, shown here only as a format example). After you save, the subscription appears in the SERVER group on the Home page and expands to show the servers it contains. The advantage of a subscription is that when your provider changes servers, one update syncs everything instead of you editing each server by hand.The Name / Remark field is free-form: give the entry a name you will recognize, so it is easy to pick out when switching servers on the Home page. Save when you are done, go back to Home, confirm the new entry is in the list, and move on to the next step.
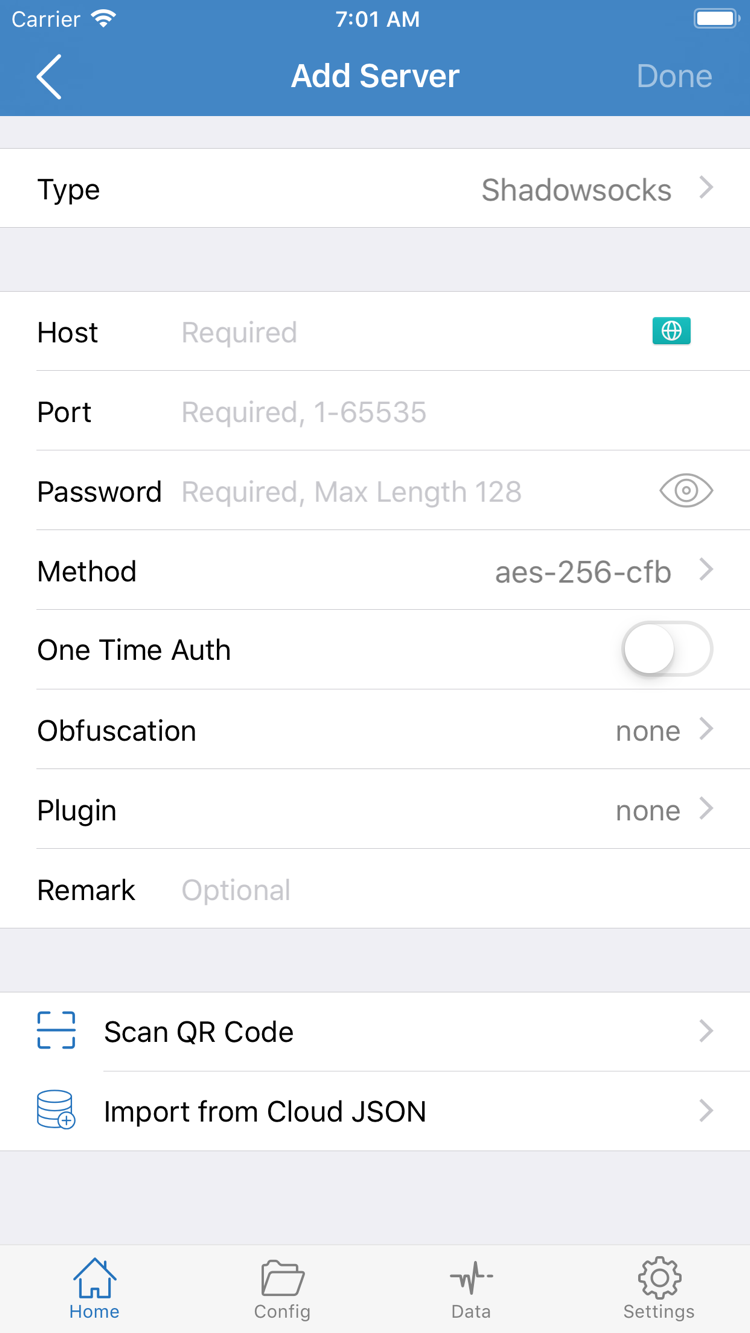
Add Server:Type / Host / Port / Password / Method -
Choose a Global Routing mode
Interface path: Home → Global Routing → Config / Proxy / Direct
Back on the Home page, there is a Global Routing row below the connection switch; it decides how traffic flows. Tap it and you get three options: Config, Proxy, and Direct.
- Config: each connection is judged against the rule set in the current Config — connections that match PROXY go through the proxy, DIRECT goes straight out, and REJECT is blocked. This is the everyday choice, and how well traffic is routed depends on whether the rule set is written correctly.
- Proxy: the rule set is skipped and every connection goes through the currently selected server. Useful for a quick check of whether the server itself is reachable.
- Direct: every connection goes straight out without passing through any server, while the VPN tunnel stays on. This is often used as a control: if the same page opens in Direct but not in Config mode, the problem is most likely in the rules or the server rather than your local network.
The rule set itself lives in Config. The Config page is divided into General / Rule / Hosts / URL Rewrite / HTTPS Decryption; rule entries are in the Rule section, and Add Rule adds a new one. Three keywords are worth remembering to start with:
DOMAIN-SUFFIX,example.com,PROXYsends connections matching that domain suffix through the proxy;GEOIP,CN,DIRECTconnects straight out for IPs registered in mainland China; andFINAL,PROXYgoes last as the catch-all. For a keyword-by-keyword explanation, see How rules are written in the blog.If your subscription comes with its own Config, just use the imported one; only open the Config page when you need to add rules yourself. Changing rules does not require re-authorizing the VPN, but it is a good idea to disconnect and reconnect so the connection is rebuilt with the new rules.
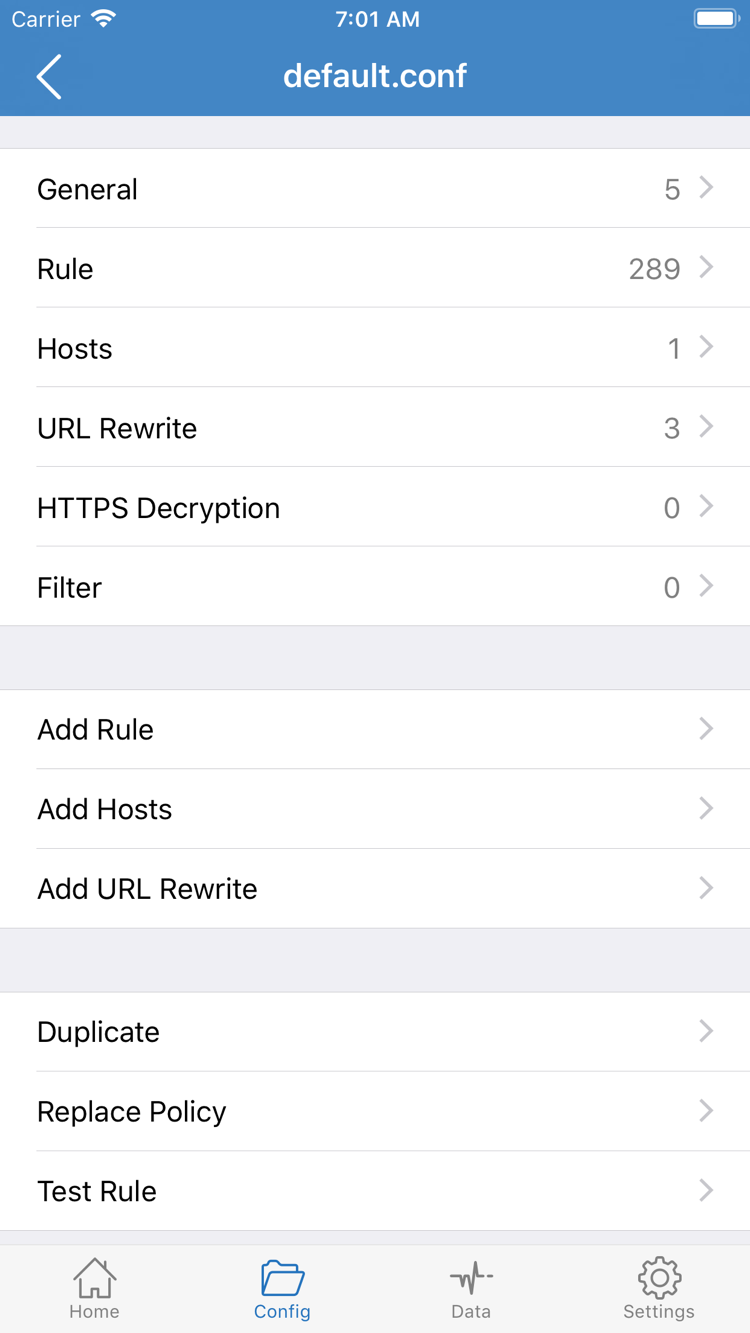
Config:General / Rule / Hosts / URL Rewrite / HTTPS Decryption -
Turn on the switch to connect
Interface path: Home → switch at the top
With the mode chosen, go back to the Home page and flip the switch at the top to on.
The first time you turn it on, the system shows a VPN configuration prompt (roughly: Shadowrocket would like to add VPN configurations). Allow it and verify your device passcode or Face ID / Touch ID as prompted. This dialog comes from iOS / iPadOS itself, not from the client. If you tap Don't Allow by mistake, the connection will not succeed; you can check the VPN settings in the system, or delete the configuration and connect again to re-authorize.
Once you allow it, the switch moves from Not Connected to connected and a VPN badge appears in the status bar. The row below the switch on the Home page shows the currently selected server; tap that row to switch servers — changing servers does not require re-authorizing.
Turning the switch off disconnects, and the VPN badge in the status bar disappears with it. If you want it to turn on automatically on certain networks and off on others, configure On Demand in Settings; for the three trigger types (Wi-Fi, cellular, and domain) and common misconfigurations, see On Demand trigger conditions.
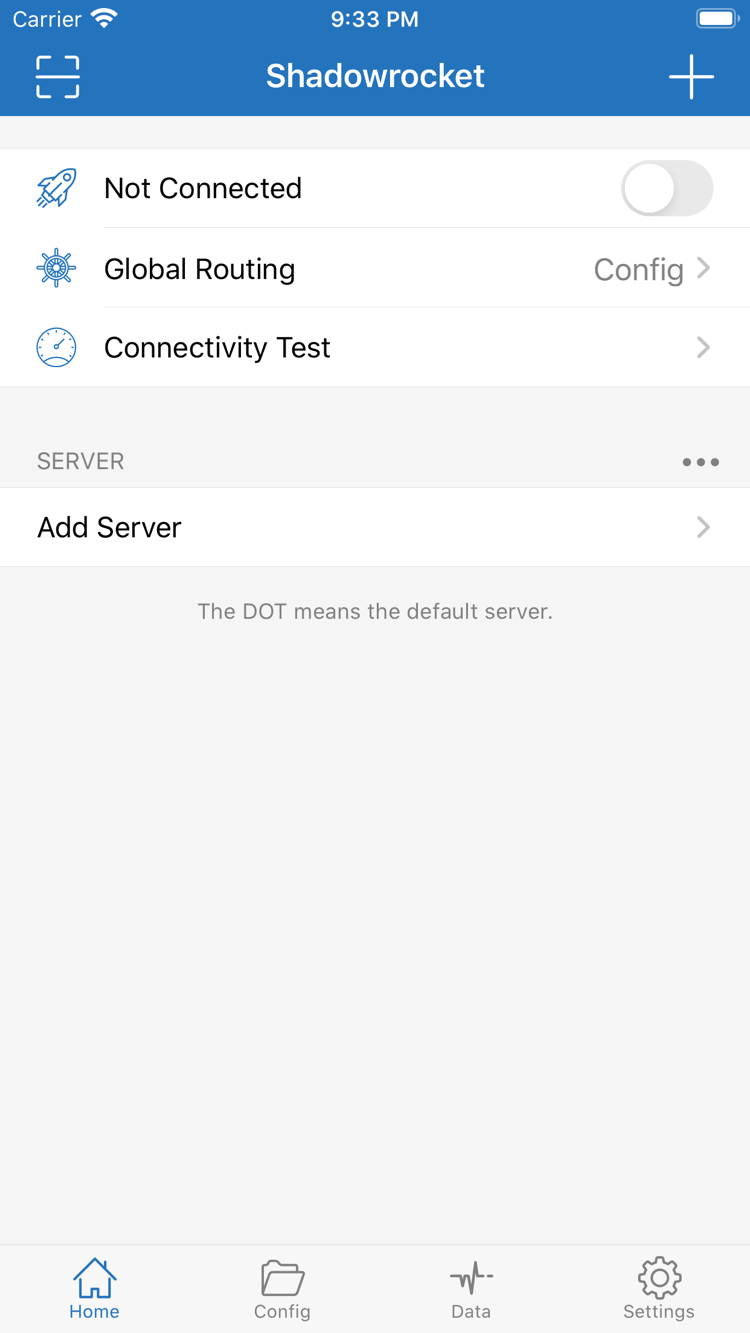
Home: switch, Global Routing, and the SERVER group -
Verify that it works
Interface path: Home → Connectivity Test; Data tab
The switch showing connected does not mean traffic is really going where you expect. Confirm it in three layers.
Layer one: Connectivity Test. Tap Connectivity Test on the Home page and the client runs each check with your current settings, reporting a result and a latency figure for each; failures are marked with a status dot. If everything passes, the chain basically works; if only one or two items fail, it is usually the target site or a rule, and there is no need to start over from scratch.
Layer two: the readings on the Data tab. Switch to Data and the two sets of counters — by server and by app — grow with traffic. Open a web page and come back to see whether the numbers changed: if they grow, traffic really is going through the client. For what each set counts, how to read the units, and why they differ from the system's own figures, see Traffic statistics by server and app.
Layer three: a control test. Switch Global Routing to Direct and reopen the same page; then switch back to Config and open it again. If both results are the same, that connection was always going DIRECT under the rule set, which is expected behavior; if it opens in Direct but not in Config mode, the problem is the server or the rules, so move on to troubleshooting. When you are done, remember to switch back to Config — do not leave it on Direct, or all traffic will bypass the server.
-
Troubleshooting common failures
Interface path: Home → subscription update entry; Settings → Diagnostics
Work through the checks below in order, reconnecting after each one; do not change several things at once.
- The switch will not turn on, or it stays disconnected. First check which entry is selected in the SERVER group on the Home page; an empty list means the server or subscription was never added, so go back to step one. Next, make sure the subscription has been updated — after a provider changes parameters, the servers in an old subscription stop working.
- The subscription update fails. Find that subscription on the Home page and update it manually from its update entry; if it still fails, check in order: is the subscription URL complete (chat apps sometimes truncate it), has the link expired or the token been reset, and can your current network reach the provider's domain. For where manual and on-open automatic updates live, and the order in which to read failure causes, see Subscription updates.
- Connected, but pages will not open. This is usually a parameter or rule problem: check Host / Port / Password / Method character by character against what your provider gave you; check that the protocol in Type matches what the provider offers; check whether Global Routing has been set to Direct; and check whether the target domain matches DIRECT or REJECT in the rule set.
- Only some apps misbehave. That is a routing problem, not a connection problem. Check the relevant rules in the Rule section of Config and, if needed, add a more specific rule with Add Rule; for match order and syntax, see How rules are written.
- It worked before and now everything fails. Run a Connectivity Test first to see whether all items fail or only some; then check whether the Data tab counters are still growing. If the problem is clearly on the provider side, contact your provider — this site does not supply servers or connections and cannot troubleshoot them for you.
- System-level checks. Make sure the device date and time are set automatically (a clock offset causes TLS handshake failures); make sure there is no second VPN configuration active at the same time; and make sure the VPN authorization you granted earlier has not been revoked.
The Settings page gathers the switches you will want when troubleshooting: Language, Test Method, Today Widget, On Demand, Diagnostics, Proxy, and TCP / UDP. The diagnostic information under Diagnostics is first-hand evidence when you are tracking down a problem, so look at it before changing settings whenever the symptoms do not add up.
The above covers the most common cases. More questions, sorted by category, are on the FAQ page; if you want to read from getting the app and first launch all the way through to day-to-day maintenance, see the Complete Guide.
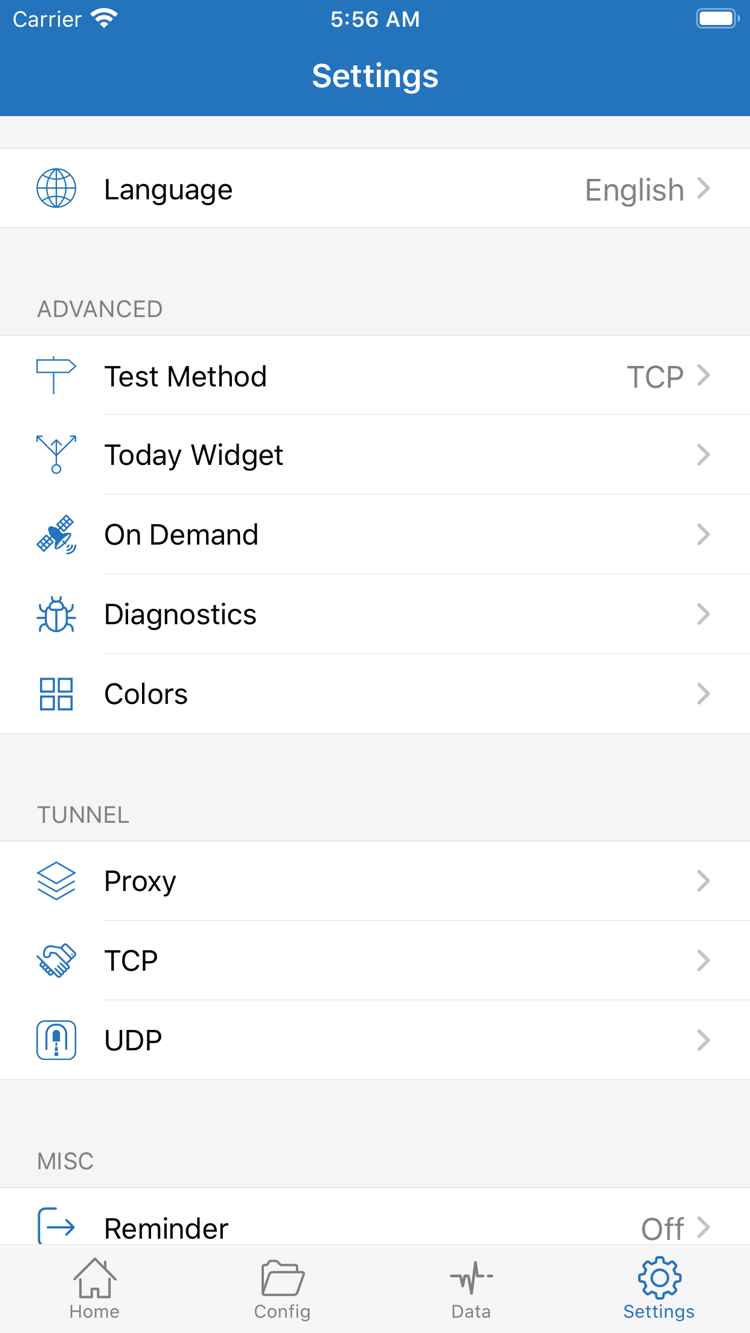
Settings:Language / Test Method / Today Widget / On Demand / Diagnostics
Global Routing is left on Config; the current server in the SERVER group on the Home page works; Connectivity Test returns results; the Data tab counters grow with traffic; and the VPN badge in the status bar disappears when you turn the switch off. If all five hold, your subscription or server is properly connected to the client.
KEEP READING
After the five steps
This tutorial covers only the main path: add, route, connect, verify, troubleshoot. Topics that go deeper — how to write rule keywords, how subscription updates work, what the traffic counters measure — live in the Complete Guide, the FAQ, and the blog.
The complete Shadowrocket guide: work through it stage by stage
From getting the genuine app on the App Store and first launch, adding servers and subscriptions, the three Global Routing modes, connecting and verifying, Data traffic, and the common Settings items, all the way to day-to-day maintenance.
Read the Complete Guide →FAQ: verifying the genuine app, importing subscriptions, and routing troubleshooting
Organized into four categories: verifying and buying the genuine app, installing and first launch, importing subscriptions and servers, and rules, routing, and troubleshooting — jump to the category you need.
Browse the FAQ →How rules work: what DOMAIN, GEOIP, IP-CIDR, and FINAL each match
Explains what each keyword matches and the order in which rules are matched, with examples you can copy as-is.
Read the full article →